How to Clean & Organize Your Refrigerator
 Is meal planning a struggle? I'm so excited to announce... The CHK Seasonal Meal Planner is now available!!! Plan your meals with purpose and intention as you think through special days, holidays, and what each season uniquely offers. It will guide you, step-by-step, through planning each month allowing you to save time and money.
 Have you ever wondered how to correctly clean and organize your refrigerator? This step-by-step comprehensive tutorial will not only walk you through the process of deep cleaning the inside and outside of your refrigerator and freezer BUT it also includes a complete guide of how to organize all the foods on each shelf and the function of each drawer!
This is the ONLY refrigerator cleaning and organizing guide you will ever need!

This year let’s create a haven at home with the 52-week home project. Small, managable weekly tasks and challenges to create a space that promotes peace, inspires creativity, nurtures your family and is not only more organized but also runs with more purpose and intention.
To catch up on all the previous projects, head here.

Last Week’s Project
The refrigerator is the main workhorse in the kitchen keeping all the perishable food chilled and frozen. It comes in contact with a lot of raw meats, fresh produce, leftovers and condiment bottles all carrying their own bacteria and germs.
It’s best to keep a refrigerator clean by wiping out any spills as soon as they occur and giving it weekly quick cleanings, I try to do this when meal planning and making a grocery list. Every week you should be checking for foods to use up quickly, or to throw out, wiping up any messes or spills and giving the outside of your fridge a wipe down too. Think of how many times those door handles are touched each day?!?!?
When your refrigerator is cleaned and organized correctly, food keeps fresh and doesn’t spoil because you know what you need to use up. Along with saving money on food, a clean refrigerator also runs better which can help keep your electricity costs down too.
If you haven’t given your refrigerator a good deep cleaning in a while, now is the time to do it! Deep cleaning the fridge and updating my freezer inventory is a regular part of my monthly and annual cleaning tasks.
While it can seem overwhelming, especially if you have a pretty dirty fridge, I promise you it’s not that hard to give it a good deep cleaning. Set aside 30 minutes or so (this is when I listen to my favorite podcasts) and get to work with the super simple, step-by-step tutorial of how to easily clean and organize your refrigerator the right way.

Project #10: Refrigerator & Freezer Deep Cleaning
If you have more than one refrigerator or freezer, start with the main one you use which is probably located in the kitchen. If time allows you can tackle the other one or you can wait for later on in the year during one of our grace weeks.
Gather your cleaning supplies. You will want some basic cleaning supplies to get the job done quickly and efficiently.
- A bucket with warm, soapy water (I use 1 part soap with 10 parts water )
- rags
- a multi-purpose disinfectant spray
- vacuum
- trash can or trash bag
- towel or rug to place on the floor to catch any spills
Some helpful optional tools are Magic Erasers (I LOVE these things, they seriously get just about everything off), rubber gloves and cooler to place food in if you think you might take a while cleaning.
As a side note, I love ordering my cleaning supplies from Grove Collaborative (formally ePantry). They carry the best, high quality, safe cleaning and household products. You can learn more about why I love them here and sign up to receive a $10 credit off your first order!
Start with the refrigerator first. Remove everything from the refrigerator. As you are taking the food out, check for expiration dates, rotting food or anything you know your family just won’t finish throw it out.
Clean the inside. Starting from the top shelf working down, use warm, soapy water to wipe down all the shelves, walls, drawers, and door compartments. If the shelves and drawers are removable, it might be easier to take them out to clean. Be sure to get all those little nooks and crannies where food crumbs may be hiding. Don’t forget the door seals!
Organize Your Space. Before you place the food back inside, arrange your shelves so they are at the right height for you to organize your foods.
Line Your Shelves and Drawers. Place folded paper towels in the bottom of your produce drawers to help absorb any condensation, drips or to collect crumbs. Place a box of Baking Soda opened on a shelf to help absorb the smells but clearly label the date and remember to change it out every 90 days (Don’t follow my example!)
Hot tip :: While Fridge Coasters are pretty (you can also make your own), you can also apply Press ‘n Seal Wrap to line each shelf and drawer. Now when you have a mess or spill, simply pull up the wrap and the mess is gone! Brilliant!
Place everything back in the refrigerator. Make note of any new foods or storage containers you need to purchase.
Move on the freezer. Once a year or so you should unplug the freezer so it has a chance to defrost but to be perfectly honest I rarely do this 😉 I just pull everything out to organize and wipe up any spills or messes.
Remove all the food. Place everything on the counter to survey and inventory. Make a list of everything you have and by what date you need to use it by. You’ll want to act quickly so nothing has the chance to thaw.
Throw out any food that is freezer burnt, not correctly labeled or is past it’s prime.
Wipe out the inside of the freezer to remove any food messes or crumbs.
Place the food back into the freezer. I personally like to organize each shelf by food types – meats together, frozen vegetables and fruits together, breakfast items together, etc.
Clean the outside of the refrigerator. Don’t forget to give the outside of the fridge a cleaning. Remove all the papers, art projects, magnets or anything else sticking to the front or side of the refrigerator.
Wipe down the doors and handles. Using a cleaner safe the finish of your refrigerator, wipe down the outside of the doors, the handles (use a disinfectant to regularly wipe down the handles, they get so yucky!), the sides (if they are exposed) and the top.
Vacuum the coils. Remove the vent on the bottom to vacuum and wipe out the refrigerator coils. If you can, move the refrigerator out so you can clean behind the refrigerator and the floor underneath.
How to Organize a Refrigerator
I’ll admit, I have never really taken the time to truly understand the function of each of the drawers in my refrigerator and how to best organize the food inside to maximize climate control. I would normally throw things in where they “fit” and close the door.
But I was tired of food rotting before I used it up either because it was pushed back behind newer foods being put in or I wasn’t properly storing the food correctly. I was fed up with throwing away forgotten food so I knew it was time to take control of my refrigerator organization once and for all and truly learn the functions of each of those little drawers.
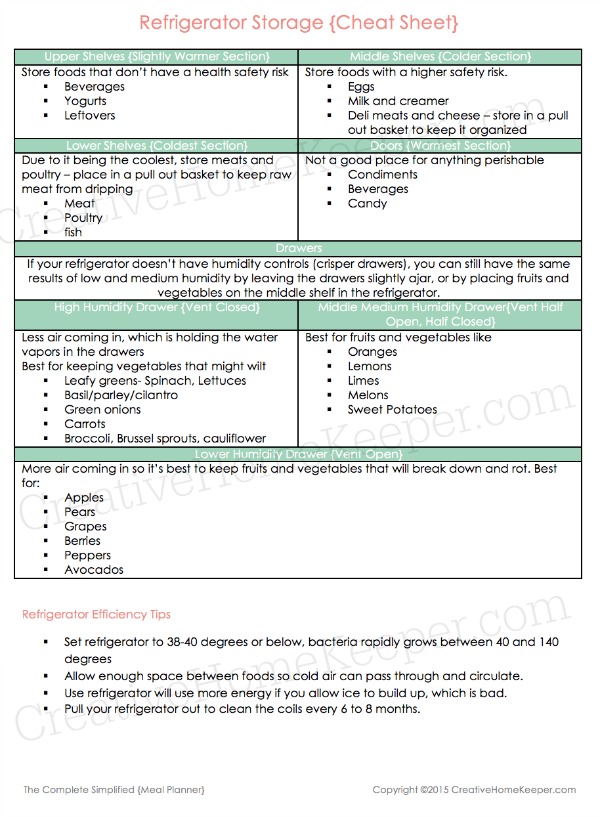
How to Correctly Store Food Inside of Your Refrigerator Shelf-by-shelf
Food Storage Tips
To keep food lasting longer in your fridge, here are a couple of good tips:
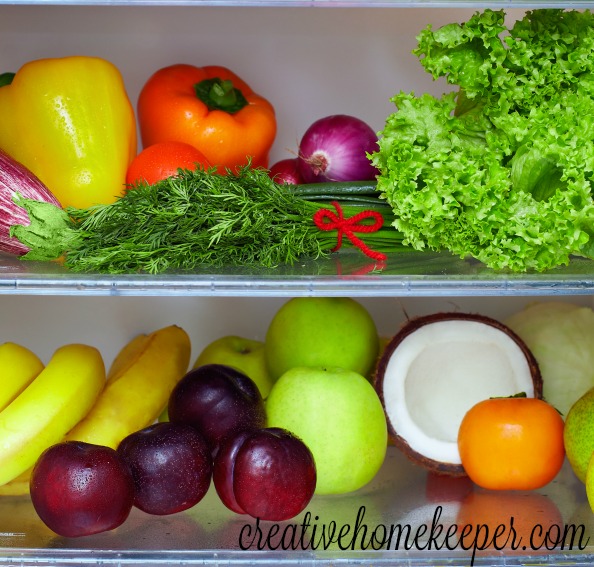
Fresh Produce
Keep berries lasting longer by washing before you place in the fridge with just a bit of vinegar mixed with water. Make sure you let them completly dry before storing them in a plastic or glass container.
Wash and dry your lettuce and fresh greens. Store romaine lettuce wrapped in a damp paper towel and store in a plastic bag. If your greens are already pre-washed, remove them from the package and give them a quick wash and let dry. Store in a glass bowl or container with a lightly damp paper towel over them.
Remove any vegetables, including pre-cut, from the plastic bags they come in. Sort for any rotting piece and place the rest in containers or vegetable bags. Mushrooms tend to store best in paper bags or wrapped around a paper towel.
If your fruits or vegetables are starting to be over ripe or near rotting, freeze them! Frozen fruits are great for baking, smoothies or a cool treat on a hot day. Frozen vegetables are so versatile, perfect for roasting, throwing in the crockpot, or in a casserole… no need to defrost before cooking!
Delicate herbs, like parsley, cilantro, or green onions tend to store best in a container of water but I’ve also had success wrapping in a damp paper towel and placing in a vegetable bag. Hot tip :: place the bottom onion whites in a glass of water and they will regrow!
Apples, oranges, clementines, mangoes and other thick skinned fruit store well in the fridge but try to keep them seperate if at all possible.
I like to place my onions in the freezer for about 30 minutes or so before chopping to get the tears from flowing when chopping.
Bananas, fresh garlic, potatoes, tomatoes and squash tend to keep better at room temperature. Keep bananas bunched together to last the longest but due cut them up to freeze before they get too far gone
Meat & Eggs
If you aren’t going to freeze the meat but have plans to use it up soon, keep it in it’s original packaging to avoid bacteria from spreading.
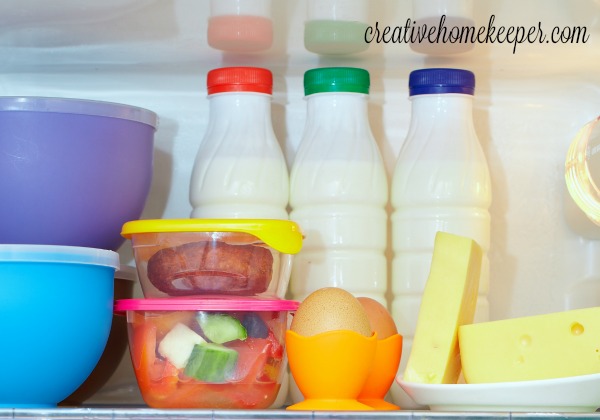
Keep eggs in their original carton and out of the cute door holder. If you are unsure of an egg’s freshness, place in a bowl of water. If it’s fresh, it will it will sink to the bottom, if it floats it’s time to throw it out.
I keep lunch meats in their original packaging and place open bacon in a plastic bag to be used in the next few days. Bacon and unopened lunch meat can also be frozen.
Dairy
Keep milk, yogurt, sour cream, shredded cheese, cottage cheese and butter in their original packaging. Butter and shredded cheese also freezes really well when left in their original packages.
Wrap cheese blocks or wedges in wax paper to keep the cheese fresh longer.
Leftovers
Place in clear glass containers on a visible shelf so you can see them. Plan to eat them within the next day or two or freeze immediately.
Freezer Tips
To prevent the great mystery of “What is in this bag/container?” always label everything! Dry erase markers erase beautifully on plastic or glass containers if you don’t want to attach sticker labels.
Keep a regular freezer inventory with dates of when it was frozen and how much you have. When you menu plan, use up what needs to be eaten first.
Wrap meat in wax paper before placing in a freezer bag that way you can pull out what you need and it keeps the meat from freezing into one big hunk.
Keep pre-packaged fruits and vegetables in their original bags. If opened, secure them with a clip or tie and place in a freezer bag.
Store ice creams and frozen treats near the ice maker.
While it’s tempting to stock your freezer full, to run efficiently you freezer needs plenty of space to circulate the air. Keep the walls and back of the freezer clear from bags or food.
A New Project for a New Week
Each week I’ll share a new challenge to help us tackle one small area of our homes.
Some weeks it might be a deep cleaning task, some weeks it might be a decluttering task, some weeks it might be a challenge to help you create a space you love, and some weeks it might be a combination of a few different challenges.
The goal for the 52-Week Home Project is to have a home that is not only more organized but also runs with more purpose and intention and just feels more peaceful and calm.

The Next Project
For the final week in our deep cleaning of the kitchen we are going to be tackling our dry food storage whether that be in a pantry or a cabinet.
Project #10: Food Storage
- Remove all the food. Take everything out of the pantry and place on the countertop. Check for expiration dates and food that is past it’s prime. If it is open but still good and you know you aren’t going to be eating it, create a pile of food to donate to your local food pantry. Spoiled food past it’s expiration date should be removed.
- Clean the inside. Starting from the top shelf working down, use warm, soapy water to wipe down all the shelves, walls, drawers and door compartments. If the shelves and drawers are removable, it might be easier to take them out to clean.
- Bulk food storage. Create an organizational system to store bulk or packaged food in to keep from spilling. This might look like storing foods in plastic food bins or ziplock bags to seal for freshness. Clearly label all containers and bags.
- Organize your shelves. Keep like foods together and in reach of convenience. If you want your kids to easily access certain snack foods, place them at a level they can reach. Stack cans and glass jars together. Condense packaged foods in baskets or containers.
Next Sunday I’ll share my progress as well as give our next challenge in the 52-Week Home Project so be sure to stay tuned.
Missed a project in the 52-Week Home Project? Head here to see the complete list of all 52 projects!
How did you do with your 52-Week Home Project this wee? Share your results in the comments below, including a link to your blog post or photo you shared on Instagram, Facebook or Twitter with the hashtags #The52WeekHomeProject


I needed this today! I’m on spring break and working to clean and declutter, and I always save my fridge for last (I think in the hopes I’ll run out of time and not have to do it. Not a great plan!).
This was super helpful! I really love that you took the time to write out how it should be in the fridge! I can’t wait to try out these ides!
This! This is exactly what I needed. Thanks for sharing!!
Great methods to help with my madness! Thanks for sharing.
Awesome! I haven’t had the time to clean our refrigerator so these tips will surely help.
There are so many great tips in this article, but the saran wrap press and seal liners are GAMECHANGING! OMgoodness, why haven’t I thought of that before! THANK YOU!
This is such useful information. I always hate cleaning my refrigerator, but I always feel better after I do. I am definitely going to use this guide the next time I do it.
I have been doing really well purging the items from the fridge, but not nearly enough to actually clean the fridge & freezer. Thank you for the tips!
Love the printable! I really need to clean and re-arrange ours. I’d be embarrassed for anyone to see it right now!
I really need to do this! Once I clean it I also need to line the shelves, that would help with clean up so much.
These are fantastic tips! I love the reference sheet! Thanks for sharing!
Love the press n seal tip. That is such a good idea. I hate cleaning my fridge, and that would certainly make it easier.
These are great tips… Fridge is my worst nightmare to clean. I’m pinning this so I can come back on my next fridge cleaning day!!!
Hugs
Great tips! Will be sure to use a couple of these when I start my deep kitchen cleaning this weekend. It will be my first time to try not using any chemical cleaning agents. I hope vinegar and baking soda does a good job! I’m so happy I ditched toxic cleaners a while ago. I mostly use soapnuts, vinegar and baking soda for cleaning. Great roundup of DIY cleaners! I love making my own cleaners and other household products using basic ingredients I can find in my pantry and some of my favorite essential oils.
Hello Victoria,
This is really good ideas! I will apply right away all the steps to refrigerator to make it clean. Should I use for freezer as well?
I’d do a clean out of your freezer so you can inventory it as well as defrost any ice and give it a wipe down. It also helps to organize your freezer contents so you know what you have and where to find it. Good luck!
Hi
Great share,,,
Well, Containers are a good way to keep your food safe. I love to use these containers in a fridge. They are a great size to contain items like yogurt cups, fruit, salad dressing bottles or other condiments. I really like the handles for easy use as well. You can label them too. Even better: they are inexpensive and you can purchase them at Wal-Mart.